 0 ITEMS IN CART
HOW TO STORE YOUR VEGETABLES THIS FALL
10/25/19 — Ada Broussard
You open up your fridge, assume a squatting position, and look in the back right corner of your bottom shelf. There lies a crispy bunch of lemongrass, as well as a mushy (and now brown-spotted) eggplant. In your crisper drawer, beneath the mystery bags filled of root crops, is a moldy beet.
Things have gotten out of control in your fridge, vegetables are heading to the compost, and this lingering local produce is becoming more burden than bounty.
WE’RE HERE TO HELP.
![]()
With the seasonal shift upon us, there are some new vegetable players showing up in your CSA box or farmers’ market haul. Many of our new CSA members are reading this (hi!!) and so they’re all new. Today, we’re taking this opportunity to share our wisdom on how to store these vegetables once they make it home to your kitchen. Knowing how to properly store your vegetables is an acquired skill, and once you start to employ these storage techniques, the shelf life of your veggies will extend and you will be happy. Refrigerator equilibrium is now restored, and vegetables are back to being a bundle of bounty, devoid of any burden.
Those of who have been around for a while know that this isn’t the first time we’re talking veggie-storage. But it’s so important, that it begs another post.
Some general storage knowledge to frame your decision making:
PUT A STOP TO MOISTURE LOSS: Vegetables contain lots of water, and as soon as they’re picked, they begin to lose this water, or moisture. This moisture-loss is what causes a vegetable to wilt. Once vegetables arrive in your kitchen, you should think about how you can put a stop to this moisture loss! Generally: keep vegetables in bags, in your fridge. Bags will help trap the moisture around the vegetable instead of letting the water evaporate into the refrigerator. When you set a naked vegetable on a fridge shelf, it’s bound to dry up. Here at the farm, we store most vegetables in closed bins and even hose down the floors of our coolers - all in attempt to retain the moisture. This is what keeps a carrot crunchy and a head of romaine perky.
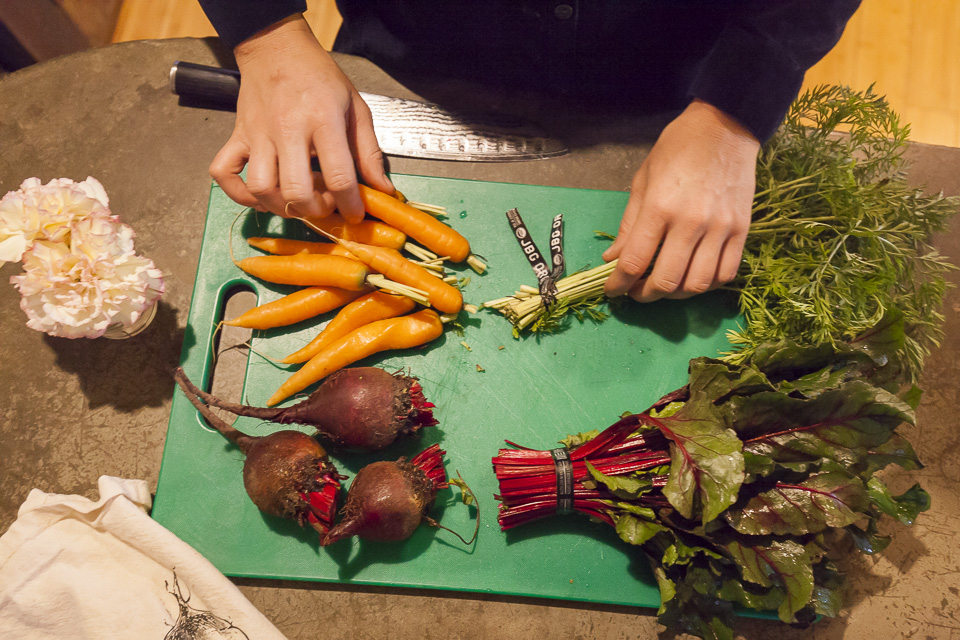
SEVER THE ROOTS: If you receive bunched vegetables (i.e. turnips, beets, carrots, etc., that have the root attached to the greens), you should remove the roots from the greens as soon as possible. Aka, as soon as you unpack your vegetables! If attached, the greens will operate under a “business as usual” assumption, and will continue to pull moisture out of the root, just as it would do in the field. This will leave you with a soft (albeit edible) root end. Detach those leaves, store the leaves and the roots in separate bags, and you’ll be assured to get the most enjoyment out of this two-for-one vegetable. The roots will last a bit longer than the greens, so saute your turnip greens on Tuesday, and roast the bulbs on Friday.
![]() Separate roots from stems and leaves to prevent the roots from becoming soft. Photo by Scott David Gordon.
Separate roots from stems and leaves to prevent the roots from becoming soft. Photo by Scott David Gordon.
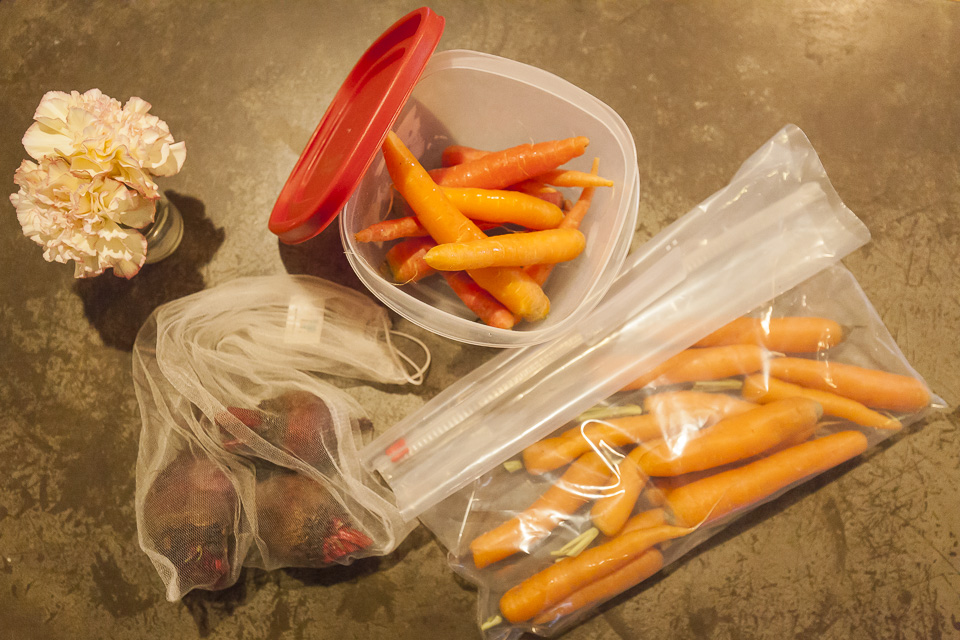
BAG IT: In the list below, we mention “place them into a bag or a container” quite often. This deserves a little more elaboration. A container can mean a glass or plastic Tupperware, and a bag can mean a plastic bag, recycled produce bags from the grocery store, ziplocks, or even fancy mesh produce bags like this .These stasher bags are all the rage right now, and these would also work perfectly for prepped veggies like sliced carrots, ready for a hummus dip. If using a ziplock or Tupperware, it’s a good idea to crack the opening so as to capture most of the moisture, but to allow an escape route for ethylene. These cloth produce bags are also awesome - get them damp, and they’re retain even more moisture. Though the plastic bags might seem wasteful, please note that you can reuse them until they basically fall apart and the zippers break. New kale goes into the old kale bag… if you use a paper towel to wrap veggies, you can reuse it to wipe up a spill, so on and so forth. Protip: Use clear bags and clear containers so you can actually see what you’re working with.
![]()
![]() Krishna's impressive collection of containers. Photo by Ada Broussard.
Krishna's impressive collection of containers. Photo by Ada Broussard.
Potatoes - Despite not actually being related botanically, potatoes should be treated just like sweet potatoes. To mimic a dark cabinet, you can always place potatoes in a brown paper bag on your counter top.
Broccoli + Cauliflower - Get these yummy crops into a baggy or container in the refrigerator’s crisper drawer, and they should be good for a week.
Bulk Roots (rutabagas, radishes, turnips, beets without greens attached) - If greens are attached, remove and then store in the refrigerator in a bag or container of some sort to keep the moisture in. Beets can last up to 3 weeks, radishes can last up to 2 weeks, and lastly, turnips and rutabagas can last up to 2 weeks. The greens of beets and turnips should be enjoyed within 3 days of being trimmed, and stored in a container or bag after being cleaned and dried.
Carrots - Cut off the greens if they come bunched (Make pesto with the greens!) and put in a container or bag in the crisper drawer, and these tasty snack veggies will last about 2 to 3 weeks.
Cabbage - This should be stored in a bag or container, in the crisper drawer. In these conditions, a head of Napa cabbage can last 1-2 weeks, and a head of green or purple cabbage can last anywhere from 2-5 weeks.
Salad Greens (arugula, spinach, romaine, loose-leaf lettuce) - If these come in a little dirty, don't be alarmed. For easiest meal prep, you can wash these when you get them; however, make sure that they're completely dry before you put them in the fridge! Any water left on these leafy greens will turn them into slime. There are two great ways to ensure dryness. First off, a salad spinner - for the fall and winter seasons, this kitchen tool is well worth the cabinet real estate. You can always use the bowl for other functions, too! If a salad spinner isn’t your speed, another good way to dry greens is by laying them out on a tea towel and gently wrapping them in the towel until they are good and dry. For especially muddy greens (sometimes our low-growing spinach comes in pretty muddy), you can dunk these in a bowl of water. Pro ecological tip: reuse water to water a houseplant! If you’re having trouble keeping your greens from going bad, try putting a folded paper towel in the bag along with the greens. If you didn’t dry the greens completely, this will help to absorb the excess moisture. These should remain fresh for about 10 days.
Kohlrabi - Cut the leaves off the bulb (you can eat the greens! Clean and use within three days), scrub the bulb, and place in a container or bag in the crisper drawer. These should keep for about a week, likely longer.
Bunched Greens (chard, beet greens, kale, collards, mustard greens) - These greens should given a quick rinse and dried thoroughly before being placed in a bag and placed in the crisper drawer. Along with salad greens, you should prioritize the precious space in your crisper drawer for bunched greens. These should remain fresh for about a week.
PRO TIP: If your bunched greens arrive at your house looking a little sad, you can easily refresh them and bring them back to life! To do this: trim the bottom of the stems (like you would do with a bouquet) and place in a cup of water. Place this cup in your fridge, and put a plastic bag lightly covering your bunched greens. Store them in the fridge like this until they look better, then remove, dry stems, and place in a bag bound for the crisper drawer.
Herbs (parsley, cilantro) - Treat these like bunched greens. If they need refreshing, you can trim the stems and place in a cup of water. Once sufficiently refreshed, store these in a lightly sealed bag in the crisper drawer. They should store for about a week.
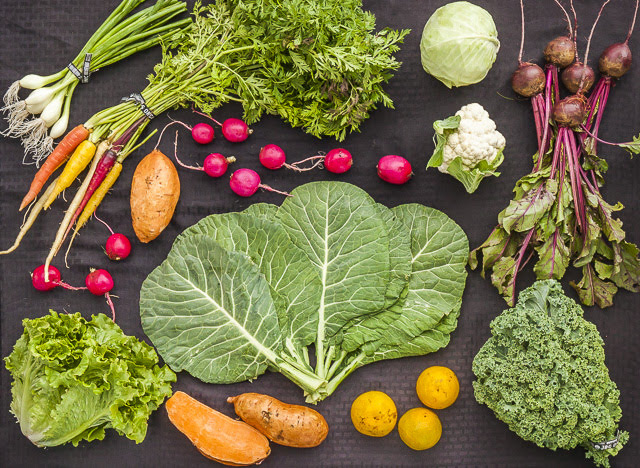
![]() Bunched root veggies are about to make their debut. Photo by Scott David Gordon.
Bunched root veggies are about to make their debut. Photo by Scott David Gordon.
Pickle it, Ferment it, or Freeze it. This post has a ton of information about ways to preserve your vegetables, long term. If you anticipate a surplus of vegetables piling up in your fridge, plan to pickle. Making a mason jar’s worth of refrigerator pickles isn’t as hard as you might think. Operation: save these veggies for later use before the are sentenced to the compost.
![]() Pickled Daikon Radishes. Recipe and photo by Nadia Tamby.
Pickled Daikon Radishes. Recipe and photo by Nadia Tamby.
Make Soup. Make a big pot of soup, or stew, with the sunsetting vegetables. Not only are we entering the perfect season for warm bowls of nourishment, but it’s also a very simple, one-pot way to use up a ton of vegetables. Here is a formula for how to make a soup with whatever vegetables you have. Exclude dairy ingredients to make a soup that is easily-freezable… Aka, make soup to eat now, and soup to eat later. Your tired, hungry, and on-the-verge-of-a-cold-self will thank you later.
Throw it in the Freezer. The easiest of options is to throw your dying vegetable into your stock bag that lives in your freezer. Oh, you don’t have a stock bag? You should start one…. Simply get the largest ziplock you have, label it stock, and then add the heads and tails of vegetables to the bag, plus veggies that are on the road out. Once your bag is full, cook the frozen veg with water, salt, and spices; strain, and use as vegetable stock. Add the bones and carcasses of chickens to this ensemble for chicken stock. You can also freeze vegetables you have in surplus to use as ingredients later. Chop and blanch first for best results.
Loosen up. Before you condemn a vegetable to the compost, make sure it’s received a fair trial. Somewhere along the way, farmers stopped selling vegetables out of the back of their trucks and instead starting distributing vegetables through grocery stores. Here, unrealistic produce cosmetic and seasonality standards were born. Just because your bunch of kale has lost it’s wow-factor, do what a farmer would do, and cook it up anyway. Because it’s still perfectly nutritious and delicious.
![]() Store your vegetables properly, and you'll extend their shelf life. Photo by Scott David Gordon.
Store your vegetables properly, and you'll extend their shelf life. Photo by Scott David Gordon.
Things have gotten out of control in your fridge, vegetables are heading to the compost, and this lingering local produce is becoming more burden than bounty.
WE’RE HERE TO HELP.
With the seasonal shift upon us, there are some new vegetable players showing up in your CSA box or farmers’ market haul. Many of our new CSA members are reading this (hi!!) and so they’re all new. Today, we’re taking this opportunity to share our wisdom on how to store these vegetables once they make it home to your kitchen. Knowing how to properly store your vegetables is an acquired skill, and once you start to employ these storage techniques, the shelf life of your veggies will extend and you will be happy. Refrigerator equilibrium is now restored, and vegetables are back to being a bundle of bounty, devoid of any burden.
Those of who have been around for a while know that this isn’t the first time we’re talking veggie-storage. But it’s so important, that it begs another post.
Some general storage knowledge to frame your decision making:
PUT A STOP TO MOISTURE LOSS: Vegetables contain lots of water, and as soon as they’re picked, they begin to lose this water, or moisture. This moisture-loss is what causes a vegetable to wilt. Once vegetables arrive in your kitchen, you should think about how you can put a stop to this moisture loss! Generally: keep vegetables in bags, in your fridge. Bags will help trap the moisture around the vegetable instead of letting the water evaporate into the refrigerator. When you set a naked vegetable on a fridge shelf, it’s bound to dry up. Here at the farm, we store most vegetables in closed bins and even hose down the floors of our coolers - all in attempt to retain the moisture. This is what keeps a carrot crunchy and a head of romaine perky.
SEVER THE ROOTS: If you receive bunched vegetables (i.e. turnips, beets, carrots, etc., that have the root attached to the greens), you should remove the roots from the greens as soon as possible. Aka, as soon as you unpack your vegetables! If attached, the greens will operate under a “business as usual” assumption, and will continue to pull moisture out of the root, just as it would do in the field. This will leave you with a soft (albeit edible) root end. Detach those leaves, store the leaves and the roots in separate bags, and you’ll be assured to get the most enjoyment out of this two-for-one vegetable. The roots will last a bit longer than the greens, so saute your turnip greens on Tuesday, and roast the bulbs on Friday.
 Separate roots from stems and leaves to prevent the roots from becoming soft. Photo by Scott David Gordon.
BAG IT: In the list below, we mention “place them into a bag or a container” quite often. This deserves a little more elaboration. A container can mean a glass or plastic Tupperware, and a bag can mean a plastic bag, recycled produce bags from the grocery store, ziplocks, or even fancy mesh produce bags like this .These stasher bags are all the rage right now, and these would also work perfectly for prepped veggies like sliced carrots, ready for a hummus dip. If using a ziplock or Tupperware, it’s a good idea to crack the opening so as to capture most of the moisture, but to allow an escape route for ethylene. These cloth produce bags are also awesome - get them damp, and they’re retain even more moisture. Though the plastic bags might seem wasteful, please note that you can reuse them until they basically fall apart and the zippers break. New kale goes into the old kale bag… if you use a paper towel to wrap veggies, you can reuse it to wipe up a spill, so on and so forth. Protip: Use clear bags and clear containers so you can actually see what you’re working with.
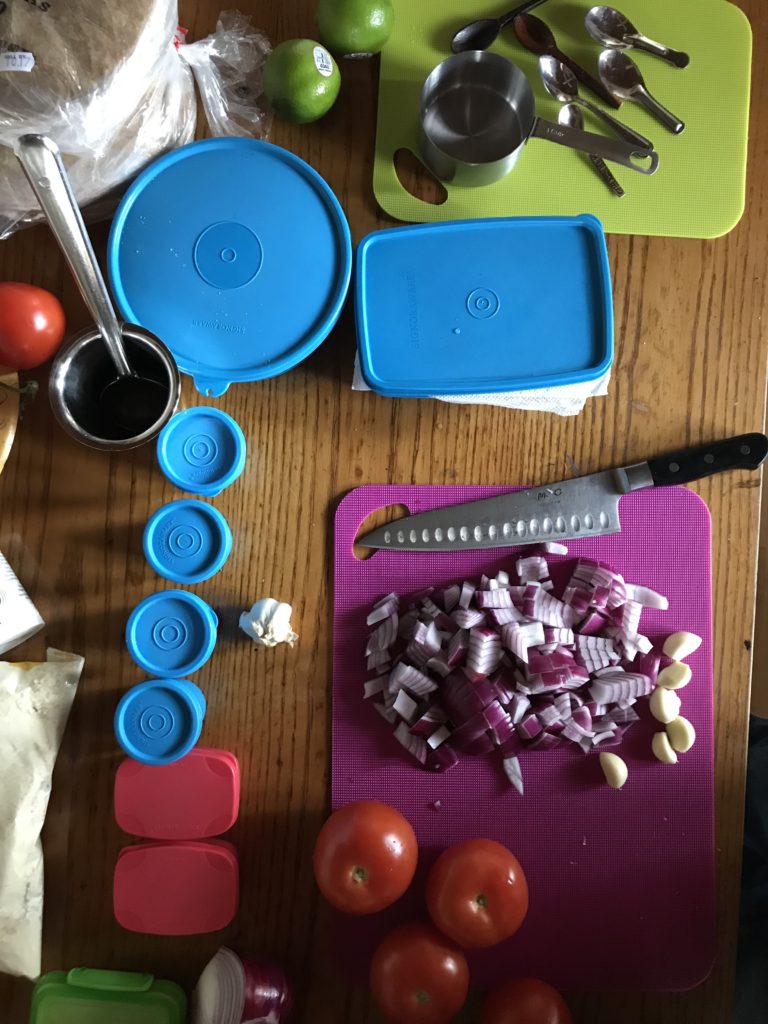 Krishna's impressive collection of containers. Photo by Ada Broussard.
VEGGIE STORAGE TIPS BY CROP:
Sweet potatoes - This early fall tubers should live outside of the fridge, and stored in a cool, dark place out of direct sunlight. Traditionally farmers would build root cellars underground to store valuable fall crops to last them through the winter. Try emulate this environment, and store your sweet potatoes at the bottom of a cabinet, in a pantry, or just in a dark corner on your counter top.Potatoes - Despite not actually being related botanically, potatoes should be treated just like sweet potatoes. To mimic a dark cabinet, you can always place potatoes in a brown paper bag on your counter top.
Broccoli + Cauliflower - Get these yummy crops into a baggy or container in the refrigerator’s crisper drawer, and they should be good for a week.
Bulk Roots (rutabagas, radishes, turnips, beets without greens attached) - If greens are attached, remove and then store in the refrigerator in a bag or container of some sort to keep the moisture in. Beets can last up to 3 weeks, radishes can last up to 2 weeks, and lastly, turnips and rutabagas can last up to 2 weeks. The greens of beets and turnips should be enjoyed within 3 days of being trimmed, and stored in a container or bag after being cleaned and dried.
Carrots - Cut off the greens if they come bunched (Make pesto with the greens!) and put in a container or bag in the crisper drawer, and these tasty snack veggies will last about 2 to 3 weeks.
Cabbage - This should be stored in a bag or container, in the crisper drawer. In these conditions, a head of Napa cabbage can last 1-2 weeks, and a head of green or purple cabbage can last anywhere from 2-5 weeks.
Salad Greens (arugula, spinach, romaine, loose-leaf lettuce) - If these come in a little dirty, don't be alarmed. For easiest meal prep, you can wash these when you get them; however, make sure that they're completely dry before you put them in the fridge! Any water left on these leafy greens will turn them into slime. There are two great ways to ensure dryness. First off, a salad spinner - for the fall and winter seasons, this kitchen tool is well worth the cabinet real estate. You can always use the bowl for other functions, too! If a salad spinner isn’t your speed, another good way to dry greens is by laying them out on a tea towel and gently wrapping them in the towel until they are good and dry. For especially muddy greens (sometimes our low-growing spinach comes in pretty muddy), you can dunk these in a bowl of water. Pro ecological tip: reuse water to water a houseplant! If you’re having trouble keeping your greens from going bad, try putting a folded paper towel in the bag along with the greens. If you didn’t dry the greens completely, this will help to absorb the excess moisture. These should remain fresh for about 10 days.
Kohlrabi - Cut the leaves off the bulb (you can eat the greens! Clean and use within three days), scrub the bulb, and place in a container or bag in the crisper drawer. These should keep for about a week, likely longer.
Bunched Greens (chard, beet greens, kale, collards, mustard greens) - These greens should given a quick rinse and dried thoroughly before being placed in a bag and placed in the crisper drawer. Along with salad greens, you should prioritize the precious space in your crisper drawer for bunched greens. These should remain fresh for about a week.
PRO TIP: If your bunched greens arrive at your house looking a little sad, you can easily refresh them and bring them back to life! To do this: trim the bottom of the stems (like you would do with a bouquet) and place in a cup of water. Place this cup in your fridge, and put a plastic bag lightly covering your bunched greens. Store them in the fridge like this until they look better, then remove, dry stems, and place in a bag bound for the crisper drawer.
Herbs (parsley, cilantro) - Treat these like bunched greens. If they need refreshing, you can trim the stems and place in a cup of water. Once sufficiently refreshed, store these in a lightly sealed bag in the crisper drawer. They should store for about a week.
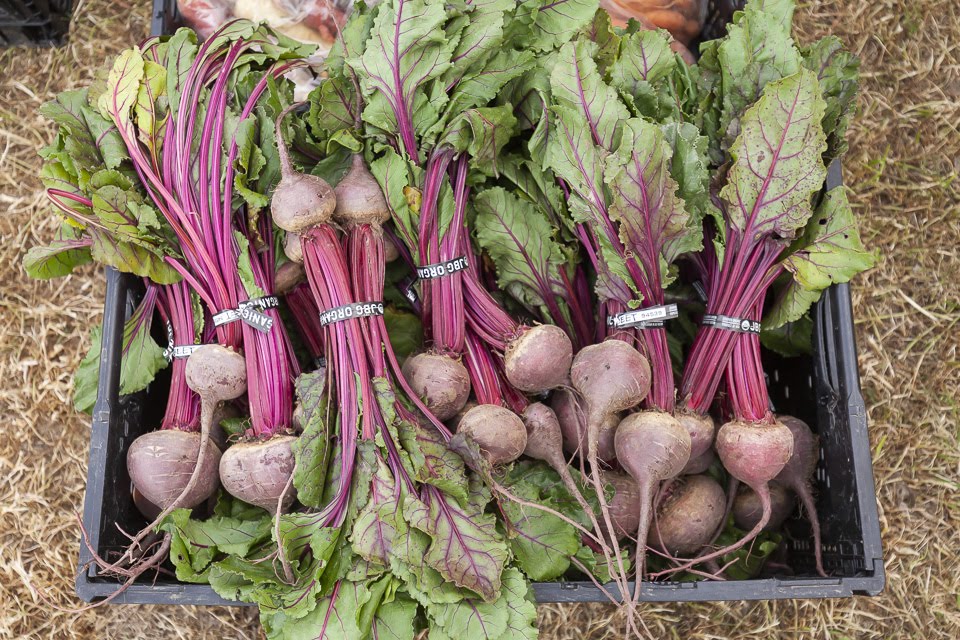 Bunched root veggies are about to make their debut. Photo by Scott David Gordon.
Habits worth heeding:
Think about the natural shelf life of each vegetable you bring home when planning your menus, and use delicate items like salad greens and bunched kale first. Unless, of course, you have an insatiable craving to roast your sweet potatoes and cover with sour cream. We will not stop you. If that’s the case, eat that first.Pickle it, Ferment it, or Freeze it. This post has a ton of information about ways to preserve your vegetables, long term. If you anticipate a surplus of vegetables piling up in your fridge, plan to pickle. Making a mason jar’s worth of refrigerator pickles isn’t as hard as you might think. Operation: save these veggies for later use before the are sentenced to the compost.
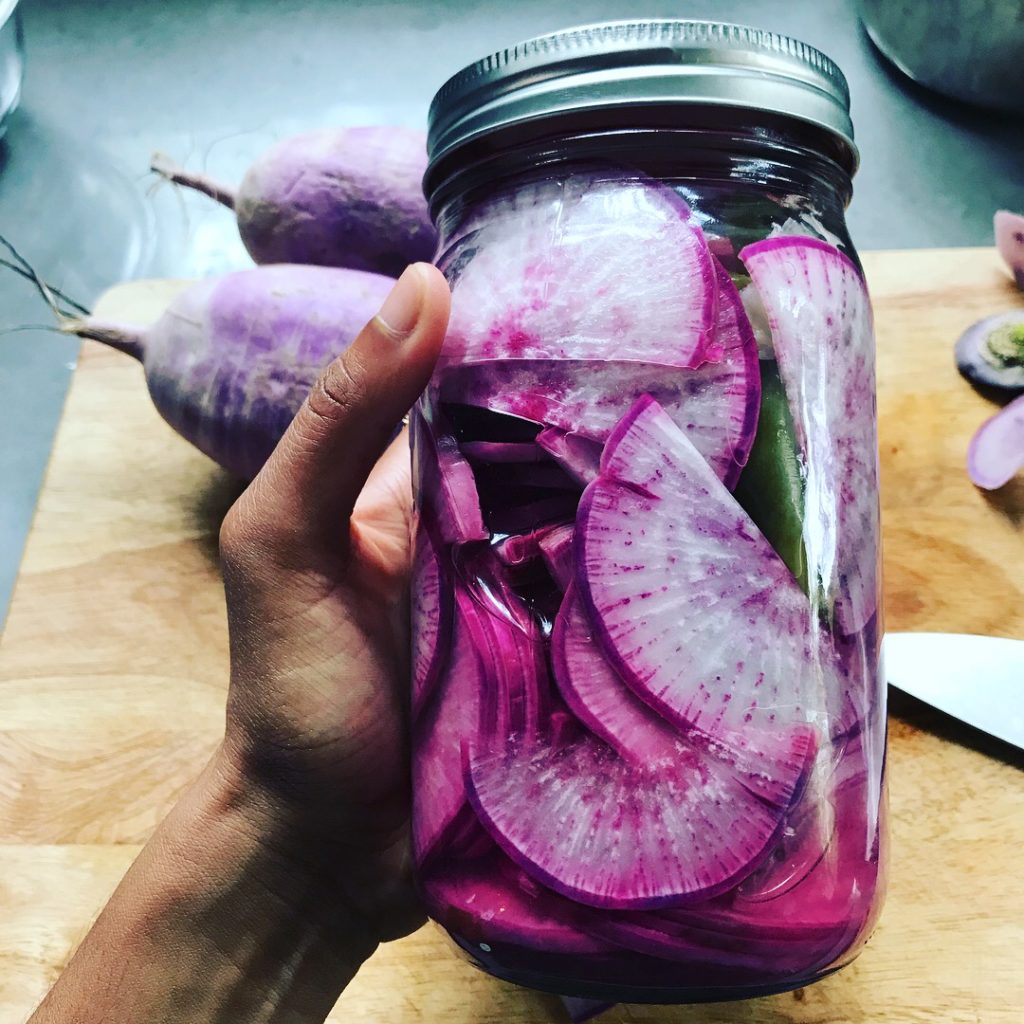 Pickled Daikon Radishes. Recipe and photo by Nadia Tamby.
Make Soup. Make a big pot of soup, or stew, with the sunsetting vegetables. Not only are we entering the perfect season for warm bowls of nourishment, but it’s also a very simple, one-pot way to use up a ton of vegetables. Here is a formula for how to make a soup with whatever vegetables you have. Exclude dairy ingredients to make a soup that is easily-freezable… Aka, make soup to eat now, and soup to eat later. Your tired, hungry, and on-the-verge-of-a-cold-self will thank you later.
Throw it in the Freezer. The easiest of options is to throw your dying vegetable into your stock bag that lives in your freezer. Oh, you don’t have a stock bag? You should start one…. Simply get the largest ziplock you have, label it stock, and then add the heads and tails of vegetables to the bag, plus veggies that are on the road out. Once your bag is full, cook the frozen veg with water, salt, and spices; strain, and use as vegetable stock. Add the bones and carcasses of chickens to this ensemble for chicken stock. You can also freeze vegetables you have in surplus to use as ingredients later. Chop and blanch first for best results.
Loosen up. Before you condemn a vegetable to the compost, make sure it’s received a fair trial. Somewhere along the way, farmers stopped selling vegetables out of the back of their trucks and instead starting distributing vegetables through grocery stores. Here, unrealistic produce cosmetic and seasonality standards were born. Just because your bunch of kale has lost it’s wow-factor, do what a farmer would do, and cook it up anyway. Because it’s still perfectly nutritious and delicious.
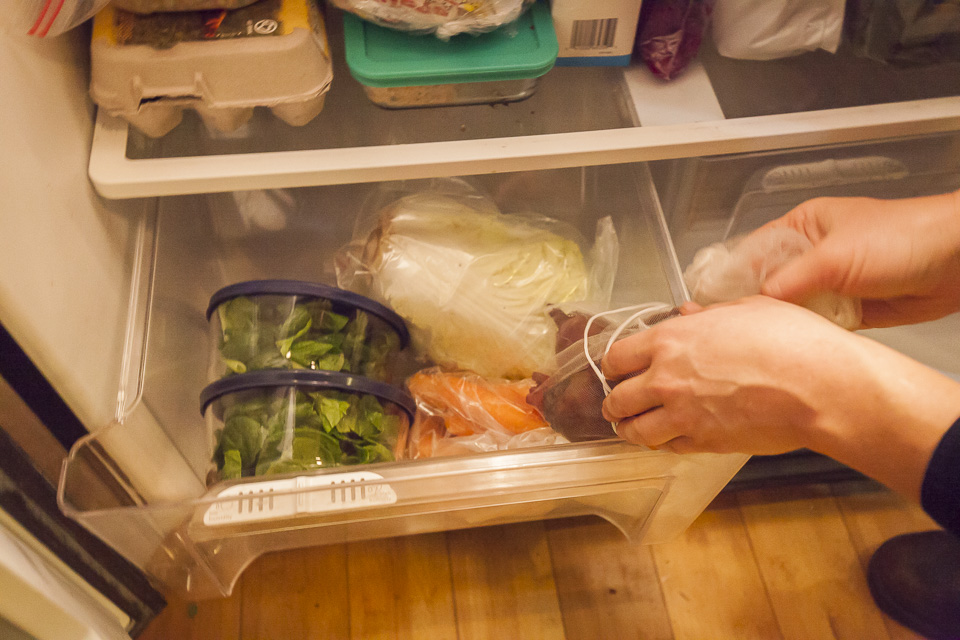 Store your vegetables properly, and you'll extend their shelf life. Photo by Scott David Gordon.